

I have had allot of people ask me about “how to” build your own fence, and it seemed like a good idea to add at least a set of quick steps to follow and make your own.
The build is pretty straight forward but if you don’t feel confident, please hire a professional contractor to build it for you. These steps are meant to guide you through the project but may not cover all the details of you particular project. Keep in mind that each location and area is different, meaning that the fence design I built may not apply to your particular project. If your fence is longer that 10 feet or needs additional segments, I would recommend you hire a professional to do it for you, otherwise you may regret it later.
Ok here we go
1. Planning
Fist of all you need to look at where you want to make the fence. I recommend taking a picture of the area and if you are computer savvy copy it drop it in to windows paint and draw some lines to get an idea of the size and how it will actually look in your house.
The fence i made is 10 ft long, to keep it simple you can make it 10ft or 8ft as these are the standard lengths of wood you will buy at your lumber yard. Any shorter lengths and you will have to cut your own lengths.Next check with your local utility company to make sure there are no gas or electric lines you may hit a line or wife while you dig. Also you need to check with city codes as to what is the maximum size you can build a fence with out needing a permit. In my area anything below 5 feet is OK, the one i built is about 3.3″ feet high.
Determining the height of the fence is important, keep in mind that although the wood you will be using is 1″X4″ in actuality it is only 3.5″ wide. I decided to leave a .5″ space between each horizontal section. This way it makes it easier to determine how many pieces you need based on the height of the fence. In my case the fence was 40″ height and used 10 pieces of 3.5″ wide wood, with a .5″ spacing.
2. Materials and tools
Here is what you will need:
- Lumber : wood is clear cedar, by clear it means there are no knots on the wood which give it the really modern look. The exact material is 1×4″ S4S WRC C & Better dry cedar. Also need 2 X 4″X4″ and 1 X 2″X 4″ cedar beams, these will be used as the main supports. You could also used exterior lumber or decking lumber if you wish although you may have a color match issue.
- Stain: The stain is a superdeck clear stain brand and the type is Valley 1906, this stain gives it a real warm touch and easy to apply. I recommend you use a foam roller for the application.
- Hardware: When you go to the lumber yard ask for deck screws, do not use any other as these will last longer and will not rust.
- Quick set cement: I used 2 bags of Quikrete 50 lb. Fast-Setting Concrete Mix you can get this at Home depot or Lowes. Make sure you use this as it will make the process much easier.
Tools:
Miter Saw, Drill, Set of drill bits, hole digger or auger, hammer, level, steel pole (this is to help you make the hole when their is rocks), scrap wood and stakes.
How to steps.
1. At this point you should already know how many 1″x4″ wood you need for your height and what the height of your supports should be. Also I would check to make sure that the length of your pieces matches each other by at least a 5″ or less. Otherwise one side of your fence will look straight and the other may not. If the length does not match use a miter saw to trim each one to the same length.
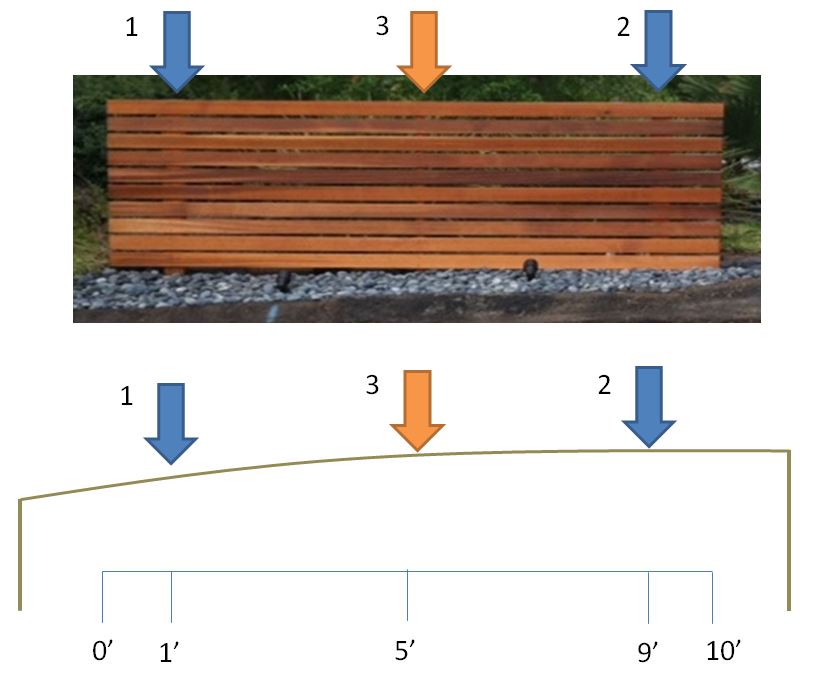
2.Mark the locations for the 3 main holes. For a 10ft fence you would make a hole a 1′,5′ and 9′.
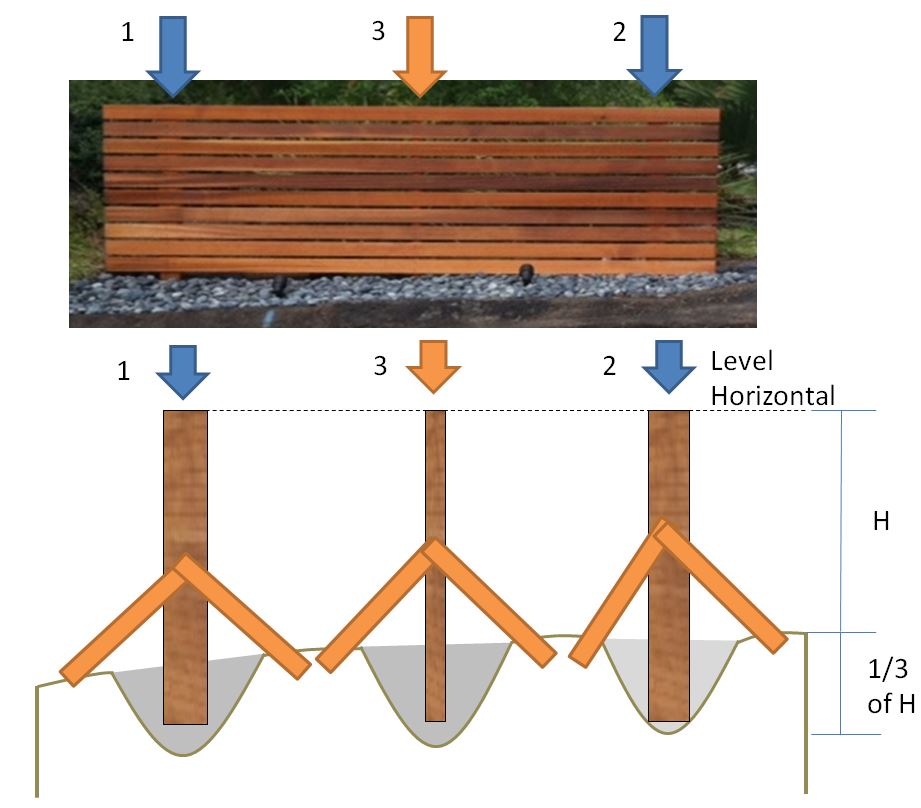
3. Start digging. You can use a manual hole digger a shovel and metal pole or can step it up and use and motorized auger. Drill holes approximately 1/3 of the height of the fence.

4. Place the 2 X 4″x4″ at location 1 and 3 and the 2″x4″ at location 3. Keep in mind the 2″X4″ has the narrow side facing forward. Using scrap wood and stakes support each beam leveled vertically and horizontally. At this point is helpful to have a helper. Make sure you level every thing a support each beam in all directions, this point is critical otherwise your fence will not be straight.

4. Following the quickrite bag instructions support all 3 beams, let it set per the instructions on the bag. I would recommend you let them set overnight and move over to seal the wood as this definitely has to set overnight.
5. As you wait for the cement to set, seal all sides of your 1″x4″ wood pieces. Its important you seal all sides and the ends. Make sure to stir the sealer as per manufacturer instructions. When you apply the sealer make sure you cover all areas but avoid leaving puddles as these will show thicker if left to set. After you go through all the pieces make sure to look through them twice to make sure you dint miss any spot.
6. More than likely you have some sealer still left in the pan, if you don’t, add some more and go back to the 3 beams and seal all the visible areas. At this point the concrete should have set and you should be able to remove the support wood and stakes. If you feel that the concrete has not been set then wait until the next day to seal the 3 beams.
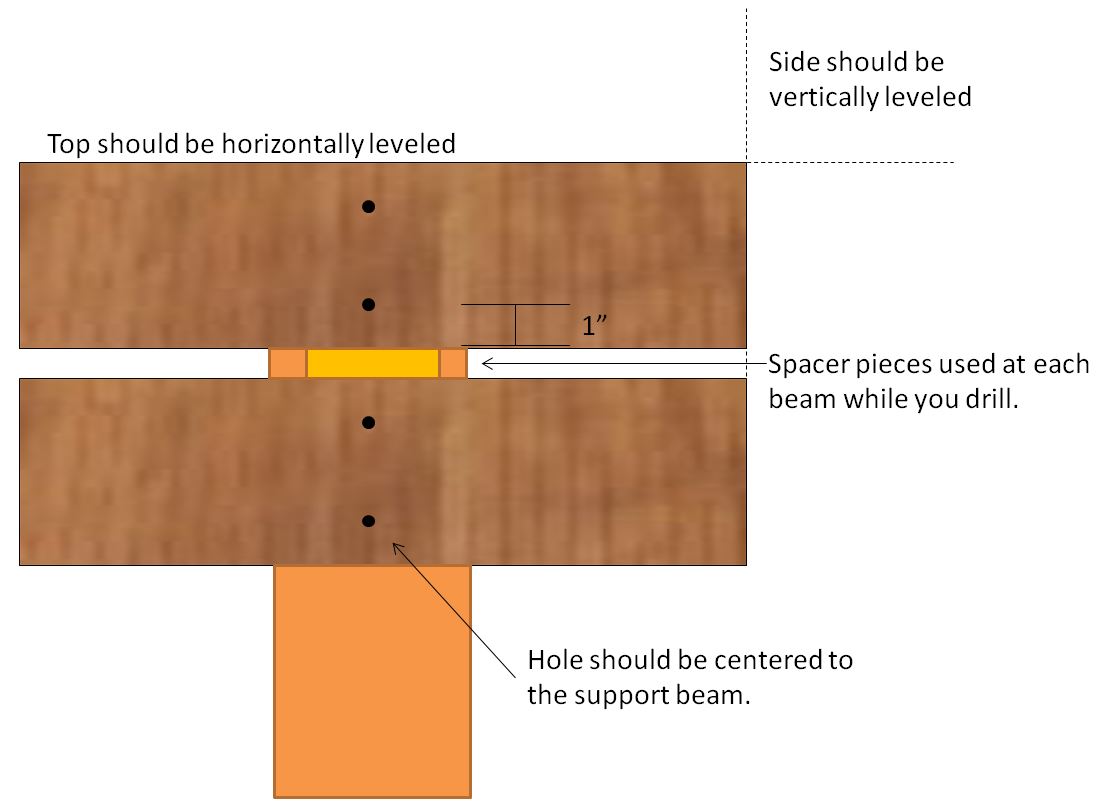
7. At this point you should be ready to start attaching your cedar to the 3 beams. I would recommend you start from the top and make sure that “1×4″ beam is level and set .25″ to .5″ above the the top of the vertical beams. This will help to make sure the fence looks truly horizontal when you look at it from the front.
Makes sure the first piece is level horizontally otherwise all the other will match the first if you use the spacers. Also make sure that you level one side straight vertically and that the piece is looks centered with the 3 support beams.
A good way to make sure your spacing is correct is to grab 3 pieces of scrap wood that is 5” thick and use these as spacers. These will be used as you start to attach the remaining pieces.

I decided to drill each piece as i attached it, this makes it much easier for you to make sure that holes look straight. I made a small drill jig using a piece of scrap wood with pre-drilled holes, this will assure your holes are at the correct spacing.
8. Continue attaching your pieces until you get to the bottom one, if you find their is a bigger gap in the bottom than you expected then it may be the spacing was incorrect. Not to worry you can always fill the area with more dirt or use beach pebbles as i did to add to the modern appearance.
If you find your self stuck at any of these steps please feel free to post your questions and I will answer them as I can. I hope this helps and appreciate your feed back with the instructions.

Your fence is awesome, I’m in the middle of building something similar however I am having the hardest time finding the right wood. I live in orange county and am willing to drive to get the right look any way you could be specific about where you purchased the lumber?
No problem look for jW lumber around your area their should be one. Ask for clear cedar and they should also have the sealer all the details are on my blog respond if you have more questions
Thank you sooo sooo much for sharing the specifics on your beautiful idea. Very much appreciated!
🙂
I love the horizontal fence look and am going to use it in my yard. Your instructions are awesome and most helpful, but how do I go about this if I have three sides to cover? The fence would have two corners.
Linda:
thanks for your comments, it gets a bit tricky when you have make more than a 8ft or 10 ft lenght and plus if you have 3 sides to cover 😉 but off course it can be done .
If you want to tackle this on your own I would make sure to place the post for all 3 sides first and then place the upper most cedar plank on each of the sides making sure that its level across all sides. The critical area will be the corners where i would add some 2 x 4 to support the corners this is to make sure that both cedar planks transition straight across. Also to get a professional finish you may have to miter the edges at a 45 degree angle. Here is a link of a website that shows what i am talking about please check out the picture see the picture that says “corner of the Horizontal fence” this will give you a visual of what you could do.
Like i said it can definitely be done although it will require some extra work, move slow making sure your pieces match together.
Hola Rodolfo – Love the fence. It is exactly what we have been looking for and your instructions are great. Thank you. My question… Did you use pressure treated lumber for the support posts, and did they match ok? If not, why not? Are you not worried about rot?
Thanks in advance
Hello actually I just used cedar 4×4 but you can use pressure treated if you prefer.
Hello actually I just used cedar 4×4 but you can use pressure treated if you prefer.
Cedar should not rot like standard lumber
Awesome fence. I’m planning on doing something similar. Did you use pressure treated lumber for your posts?
I might be a little late to the gate since I just found you, but this is the very fence envisioned in my mind. I really have little back yard so wanted to put up a bit of a shield some feet in front of the side area of my house to make a somewhat private little space for a few seats and table. Kind of kattiecorner (sp?) to the narrow side. At any rate thank you so much for the instructions.
Great to hear you are using the instructions feel free to send me pictures of the finish product to post them here
Delighted with a response. Will happily send photo when done..